

Are you looking for a way to add some extra seating and storage space to your home? A bay window bench might just be the perfect solution.
Creating a bay window bench is an excellent way to add functional seating and storage space to your home while enhancing the charm of your bay window area. This project is perfect for those looking to blend aesthetics with practicality.
Whether you’re an experienced woodworker or a DIY enthusiast, building a bay window bench can be a rewarding project that transforms an often-underutilized space into a cozy nook perfect for reading, relaxing, or simply enjoying the view.
In this guide, we’ll walk you through the steps on how to make a bay window bench, from selecting the right materials to the final touches that will complete your new favorite spot in the house.
What Will You Need?
Before you get started, gather all the necessary materials and tools. This list may vary depending on your specific design and measurements, but here are the basics:
- Measuring tape
- Plywood sheets
- 2×4 boards
- Saw (circular, jig or table saw)
- Drill
- Screws
- Wood glue
- Sandpaper
- Paint or stain (optional)
With these materials in hand, you’re ready to begin building your bay window bench.
10 Easy Steps on How to Make a Bay Window Bench
Step 1: Measure the Bay Window Area
Start by measuring the dimensions of your bay window area to ensure that your bench will fit perfectly. Use your measuring tape to obtain the width, depth, and height of the space. It’s vital to measure accurately as these measurements will guide you through cutting your plywood sheets and 2×4 boards.
Also, consider if you’d like your bench to include a backrest or armrest, as this will impact your dimensions. Write down all your measurements before proceeding to the next step.
Step 2: Cut the Wood

With your measurements in hand, you can start cutting your plywood sheets and 2×4 boards to match the dimensions of your bay window area. Use a saw that you feel comfortable with, whether it’s a circular, jig or table saw.
Make sure to cut each piece carefully and double-check your measurements before making each cut. You will need pieces for the bench seat, front face, sides, and any other components such as a backrest or armrest. If you plan to include storage beneath your bench, cut the additional pieces for the internal framing.
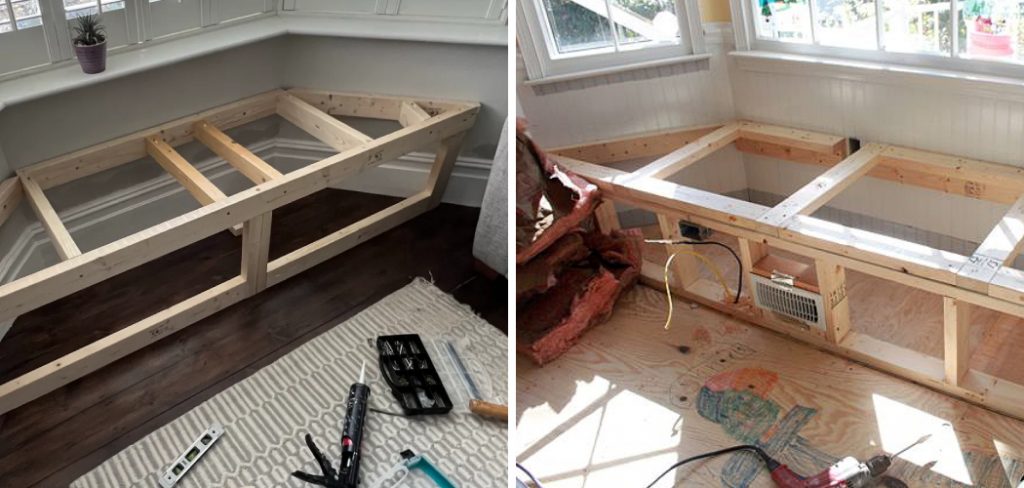
Step 3: Assemble the Frame
Begin assembling the frame of your bay window bench using the 2×4 boards. Construct a rectangular base that matches the width and depth of your measurements. Use wood glue and screws to join the corners securely and ensure stability.
If your design includes a backrest or armrest, incorporate these elements into the frame at this stage. Don’t forget to add vertical supports within the base if you plan on including storage underneath the bench. This will help distribute weight evenly and provide additional strength.
Step 4: Attach the Plywood Panels
Once the frame is assembled, it’s time to attach the plywood panels. Begin with the bench seat by securing the plywood sheet to the top of the frame using screws and wood glue. Ensure the seat is level and sits flush with the frame edges.

Next, attach the front face and side panels in a similar manner, making sure each piece is securely fastened and aligned with the frame. If your design includes a backrest or armrest, attach these panels as well. For added stability, you can reinforce the corners with additional screws or brackets.
Step 5: Sand and Prepare the Surface
Once all the panels are securely attached, it’s time to prepare the surface for finishing. Use sandpaper to smooth out any rough edges and surfaces, ensuring that all areas are sleek and even. Pay extra attention to corners and joints where splinters or uneven cuts may occur. Sanding the bench thoroughly will not only make it safer to use but also help the paint or stain adhere better.
Step 6: Paint or Stain the Bench
After sanding, you can choose to paint or stain your bench to complement the décor of your home. If you opt to paint, apply a primer first to help the paint adhere. Allow the primer to dry completely before adding coats of paint.
If you prefer to stain the wood, use a cloth or brush to apply the stain evenly, and then wipe off any excess. Consider applying a clear coat or sealant for added protection and durability for both paint and stain. Allow sufficient drying time between each coat to achieve a smooth, professional finish.
Step 7: Add Cushions and Final Touches
With your bench structure complete and finished, it’s time to add comfort and style. Measure the bench’s dimensions to select or create custom cushions that fit perfectly. Opt for high-quality foam padding and durable fabrics that match your interior design. Attach the cushions securely or place them on top of the bench.
Finally, add decorative pillows, throws, or other accessories to personalize your new bay window bench and make it inviting.
Step 8: Install the Bench

Carefully position your finished bay window bench in the bay window area. Ensure it fits snugly and aligns well with the window frame. If necessary, use additional screws or brackets to secure the bench to the wall or floor for added stability. Double-check that everything is level and securely in place.
Step 9: Utilize Storage Space
If your bench design includes storage, organize the space effectively. Use baskets, bins, or custom dividers to keep items tidy and accessible. This space can be ideal for storing blankets, books, or other items you want to keep handy but out of sight.
Step 10: Enjoy Your New Bay Window Bench
Congratulations! You’ve successfully built a bay window bench. Take some time to enjoy the fruits of your labor. Whether relaxing with a good book, taking in the view, or simply enjoying the additional seating, your new bay window bench will surely become a favorite spot in your home.
By following these 10 easy steps, you can create a beautiful and functional bay window bench that adds charm and character to your space.
5 Additional Tips and Tricks

- Measure Thoroughly: Accurate measurements are crucial for a perfect fit. Measure the depth, width, and height of the bay area where the bench will be installed. Double-check your numbers to ensure precision.
- Select Quality Materials: Choose high-quality wood or plywood for the bench’s construction. The material should be sturdy enough to support weight and durable enough to withstand regular use. Consider using moisture-resistant options if the bench is near windows prone to condensation.
- Incorporate Storage: Use the space beneath the bench for storage. Depending on your preference, you can add hinged lids to create hidden compartments or install drawers and shelves. This makes the bench both functional and practical.
- Comfortable Cushions: Add comfortable cushions to the top of the bench. Choose foam of appropriate thickness and density to ensure comfort. Select durable, washable fabrics for the cushion covers to maintain cleanliness and longevity.
- DIY or Prefab Options: Determine if you prefer to build the bench completely from scratch or use prefabricated sections. There are kits available that can simplify the process. Even if you go with a DIY approach, you can still use pre-made drawer kits to save time on storage solutions.
With these additional tips and tricks, you can take your bay window bench project to the next level.
- Ignoring Structural Support: One of the most critical aspects of building a bay window bench is ensuring it has adequate structural support. Failing to reinforce the bench properly can result in a weak or unstable construction that may not withstand regular use. Make sure to use strong supports and secure them firmly.
- Skipping Sanding and Finishing: Neglecting to sand and finish the bench can lead to rough edges and splinters, making the bench uncomfortable and potentially unsafe. Always sand the wood surfaces smoothly and apply a suitable finish to protect the wood and enhance its appearance.
- Overlooking Alignment: Inaccurate alignment can lead to an uneven or crooked bench. Precision is key whether you’re cutting wood or aligning components during assembly. Use a level and measuring tools to ensure everything lines up correctly, preventing future issues with fit and stability.
- Using Subpar Materials: Opting for cheap or low-quality materials might save money upfront, but it can compromise the durability and appearance of the bench over time. Inferior materials are prone to warping, cracking, and other damages, especially in a high-use area like a bay window seat.
- Neglecting Safety Precautions: Skipping basic safety measures during construction can lead to injuries. Always wear appropriate safety gear, like gloves and safety glasses, and follow safe practices when using power tools. Additionally, ensure that the bench itself is safely constructed to prevent accidents.
By avoiding these common pitfalls, you can ensure that your bay window bench is not only beautiful but also sturdy and safe.
Conclusion
How to make a bay window bench is a rewarding project that combines functionality with aesthetics, allowing you to maximize your space while adding a cozy and stylish nook to your home.
Following the outlined steps, from planning and constructing the bench to adding the final touches, will ensure a seamless and successful DIY project.
Remember the importance of precise measurements, quality materials, and thoughtful design to create a bench that meets your needs and enhances your interior.
With careful attention to detail and some additional tips and tricks, your bay window bench will not only serve as an inviting seating area but also offer valuable storage solutions. By avoiding common mistakes such as neglecting structural support and skipping crucial finishing touches, you can achieve a durable and attractive addition to your living space.
Ultimately, the effort you invest in creating your bay window bench will be well worth it. It will provide you with a functional and beautiful feature that you and your family can enjoy for years to come.
Huston Douthit is a distinguished figure in the world of furniture design, with a decade of expertise creating innovative and sustainable furniture solutions. His professional focus lies in merging traditional craftsmanship with modern manufacturing techniques, fostering designs that are both practical and environmentally conscious. As the author of Fruniturix, Huston delves into the art and science of furniture-making, inspiring artisans and industry professionals alike.
Education
- RMIT University (Melbourne, Australia)
Associate Degree in Design (Furniture)- Focus on sustainable design, industry-driven projects, and practical craftsmanship.
- Gained hands-on experience with traditional and digital manufacturing tools, such as CAD and CNC software.
- Nottingham Trent University (United Kingdom)
Bachelor’s in Furniture and Product Design (Honors)- Specialized in product design with a focus on blending creativity with production techniques.
- Participated in industry projects, working with companies like John Lewis and Vitsoe to gain real-world insights.
Publications and Impact
In Fruniturix, Huston shares his insights on furniture design processes, materials, and strategies for efficient production. His writing bridges the gap between artisan knowledge and modern industry needs, making it a must-read for both budding designers and seasoned professionals.